419-500-1278
We have all of your mushroom growing needs.
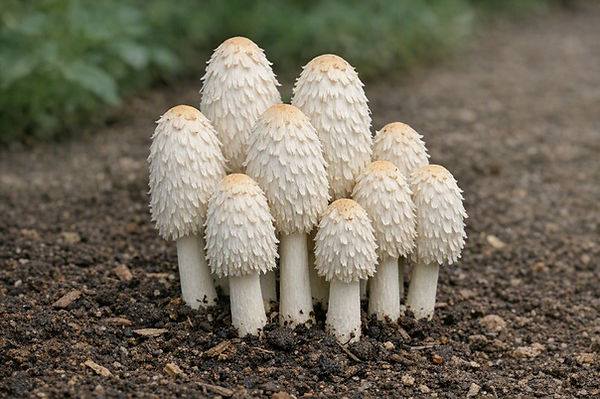


Shaggy Mane Mushroom Kit Instructions
Coprinus comatus • Outdoor bed or large-container method • Either a fully colonized substrate or freshly inoculated substrate (see label).
Quick start: Plant the colonized substrate promptly (see date of inoculation) in a compost-rich (good soil is fine), well-drained bed or large container; cover it lightly with mulch, water thoroughly, and keep it evenly moist. Shaggy Mane prefers cool, humid weather and may fruit after rain or a noticeable temperature drop. Outdoor timing varies, so patience is normal.
Before You Begin...what you should have.
-
Your unopened bag of colonized Shaggy Mane substrate.
-
Finished, well-aged compost or compost-enriched garden soil is best but not 100% necessary.
-
Mulch: Either clean straw, untreated hardwood chips, leaves (not black walnut), or finished compost.
-
A shovel or trowel, watering can or gentle hose nozzle, and optional garden gloves.
-
For container gardening: a wide container with drainage holes, ideally 5 gallons or larger.
If you cannot plant immediately: Keep the sealed kit cool and out of direct sunlight, and plant it as soon as practical. Do not freeze it or leave it in a hot location. Wash hands before handling and do not use a kit with strong sour or rotten odors, or widespread green, black, pink, or orange growth. If this has occurred to your kit, PLEASE contact us.
1. Choose the Planting Location
Select a level or gently sloped location with partial shade or dappled light, good air movement, and drainage after rain. Morning sun is acceptable but avoid hot afternoon sun and areas that stay waterlogged. Lawn edges, vegetable-garden borders, mulched beds, and large outdoor containers are good choices. Use soil that has not been treated recently with fungicides or herbicides.
Best planting weather: Plant when the ground is workable and outdoor temperatures are generally between about 50–75°F (10–24°C). Shaggy Mane fruits most readily in cool, damp conditions, often around 50–65°F (10–18°C). Protect a newly planted container from hard freezes and extreme heat.
2. Prepare an Outdoor Bed
-
Clear a planting area approximately 2 × 2 feet, or large enough to spread the kit in a loose, even layer.
-
Loosen the upper 4–6 inches of soil. For best results mix in 2–4 inches of finished compost so the bed is rich, loose, and able to hold moisture without becoming muddy.
-
Open the kit at the planting site. Break the colonized substrate gently into gulf balls or small egg pieces; do not crumble it into dust!
-
Distribute the pieces evenly through the upper 2–4 inches of prepared material. Keep pieces close enough that the mycelium can reconnect (3-6”).
-
Cover with 1–2 inches of moist compost-rich soil (if you have it), then add a loose 1-inch layer of either clean straw, untreated hardwood chips, leaves (not black walnut) or finished compost.
-
Water slowly and thoroughly until the entire bed is evenly damp. Do not flood or compact it.
If you are interested in the container option.
Use a wide container with drainage holes, preferably 5 gallons or larger. Fill it with 6–8 inches of finished compost blended with garden soil. Mix the colonized substrate pieces through the upper 3–4 inches, cover with 1–2 inches of the same blend, and finish with a thin, loose mulch. Water thoroughly and place the container outdoors in bright shade. Never allow standing water in a saucer.
3. Maintain the Growing Area
-
Moisture: Keep the bed consistently damp, like a wrung-out sponge. Check beneath the mulch rather than judging only the surface. Water with a gentle spray whenever the upper inch begins to dry.
-
Humidity: Rainy weather and high outdoor humidity encourage fruiting. During dry periods, water the surrounding soil as well as the bed, preferably in the morning.
-
Light: Provide indirect daylight or dappled shade. Darkness is unnecessary; direct, drying sun is undesirable.
-
Fresh air: Outdoor air movement is beneficial. Do not seal the bed or container under airtight plastic.
-
Protection: Keep foot traffic, digging pets, and heavy mulch away. A breathable shade cloth can reduce drying but remove it when mushrooms begin to appear.
-
4. Fruiting and What to Expect
The mycelium must first grow from the kit into the surrounding compost/soil. Fruiting may occur within several weeks under ideal cool, wet conditions, or it may wait for a later rainy period or season. Look for small white, bullet-shaped pins emerging through the cover layer. Once pins appear, keep the area evenly moist and check it at least daily; mushrooms can mature very quickly.
5. Harvest Promptly
Harvest while the caps are still firm, white, and cylindrical, before the lower edge turns pink or black. Twist gently at the base or cut cleanly at soil level. Shaggy Mane naturally self-digests into black “ink” as it matures; this is normal, but the edible-quality window is very short. Refrigerate promptly and cook the same day whenever possible. Remove overmature, blackening mushrooms from the bed.
After harvest: Continue maintaining even moisture. A well-established outdoor patch may produce additional flushes after cool rains and can return seasonally. Each spring, add a thin top-dressing of finished compost without digging deeply into the bed.
Food-Safety Notes
-
Consume only young, firm specimens grown from the planted kit, and cook thoroughly before eating.
-
Never rely only on the location of the bed to identify a mushroom; unrelated wild species may appear nearby.
-
Do not eat mushrooms showing decay, unusual odor, extensive insect damage, or black liquefaction.
-
If you are pregnant, immunocompromised, have a mushroom allergy, or have a medical condition, consult a qualified health professional before adding a new mushroom to your diet.
-
When trying any new edible mushroom, begin with a small portion.